Locations in Graveyard Keeper 2
Every named area on your map — from the starting yard to the Port Area and what you can do in each.
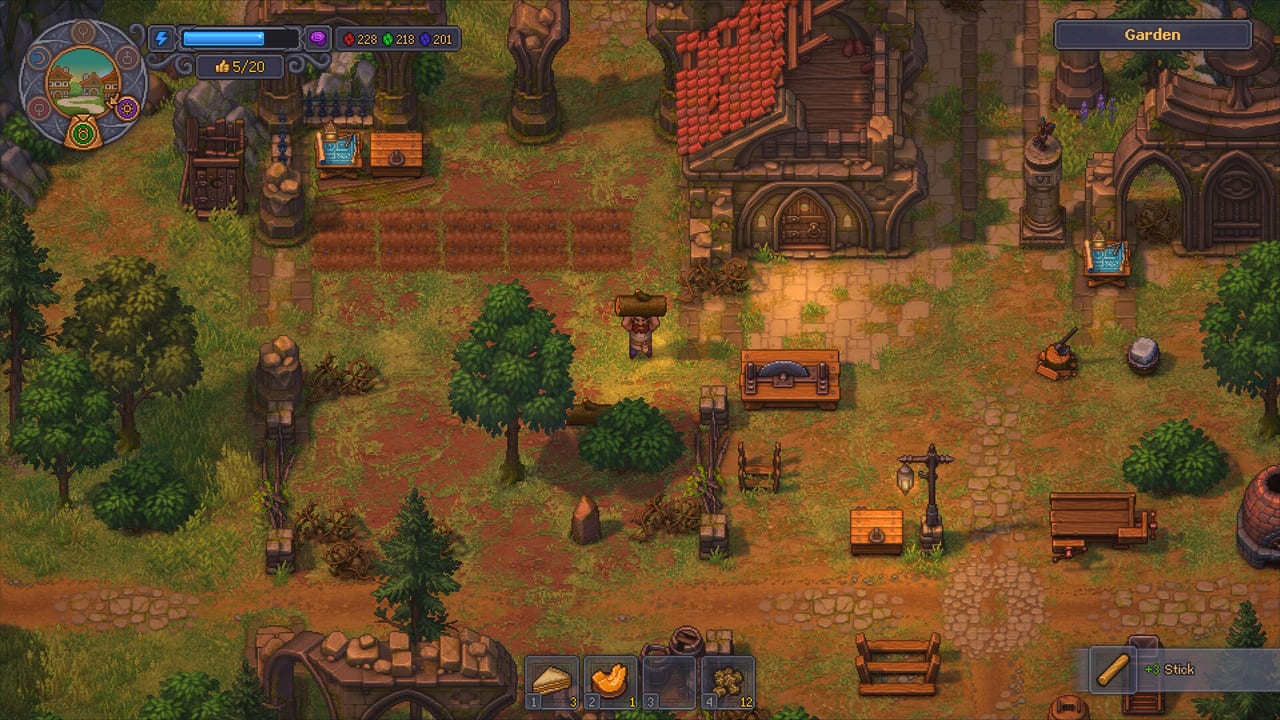
Graveyard Keeper 2 uses a location chip system. The top-right corner of your HUD shows where you are: Garden, Graveyard, Town Workshop, Astrologer’s Tower, Town — Port Area. Each named area is a distinct production zone with its own resources, NPCs, and activities. This page maps every confirmed location and what you can do in each.
If you want a specific activity (alchemy, farming, combat), use this page to find the right location. If you want a first-week route, start at Getting Started.
The Graveyard (starting area)
Your base of operations. The yard contains:
- Open dirt plots and filled graves with skull ratings
- Headstones, monuments, and benches
- A columned mausoleum or church face
- Dead trees, lantern paths, and rain atmosphere
- An [F] prompt for interaction with graves
The thumbs-up counter appears here (11/20 in one shot). Per-plot skull values show: +6, +5, +3, 0, −3. This is where graveyard management happens.
The Garden
A working agricultural yard adjacent to the Graveyard:
- Raised beds and tilled dirt for farming
- A log on the Keeper’s shoulder (manual carry)
- A lantern, benches, and a grindstone-style station
- A stone chapel corner visible in the same camera
- The thumbs-up counter (5/20 in one shot)
- Three colored resource digits in outdoor shots
This is where farming happens. The Garden is not a loading-screen joke — it is a confirmed named location on the HUD.
Town Workshop
An indoor stone hall showing zombie-operated production:
- Two rows of green-topped zombie workbenches
- Item bubbles over stations (tools, bells, fish, dolls, round loaves)
- Green pip rows under bubbles — batch progress or assigned workers
- Central lanterns down a corridor
- Round tables in corners for extra zombies
- A 66/75 counter in the official shot
This is the automation north star. Armor, tools, and consumer goods all trace back to this room.
The Town — Port Area
A hull under construction in the rain. Named in official screenshots as a distinct location:
- The southern outskirts of Town
- Construction in progress (Town restoration is active)
- Likely tied to rebuild the Town quests
- Possibly the location of the catapult in combat screenshots
This is mid-game content. Do not plan a Port Area visit for day one.
Astrologer’s Tower
A full interior with ritual rings and a crystal ball:
- Named location on the HUD
- Ritual floor Lazy Bear highlighted in the art diary
- Interior you can walk, unlike the 2D original’s locked doors
- Possibly tied to Inspirations tab (mystical research)
The September story diary mentions this location. It may be where certain tech tree or talent unlocks occur.
The Swamp
The home of Clotho the alchemist:
- Center of The Swamp during daytime — find Clotho here
- Clay deposits for pottery production
- Herb and reagent harvesting for alchemy
- Possibly darker zones for corrupted corpse collection
The Swamp is both a resource zone and a quest hub. Plan to visit regularly after you unlock alchemy.
Map and fast travel
The research UI shows a Map tab. The September diary removed the Teleportstone and replaced it with Milestones for fast travel between unlocked locations.
How Milestones work:
- Discover a new location
- Unlock a Milestone checkpoint there
- Use the Map to fast-travel between known Milestones
This is not a full map zoom — it is a checkpoint system. You still walk to new areas the first time.
Location hierarchy for first week
Day 1: Garden (farming tutorial), Graveyard (burial tutorial) Day 2–3: Graveyard modules, Garden expansion, basic resource harvest Day 4: Town Workshop (see the zombie factory, do not build it yet) Day 5–7: Swamp (find Clotho, start alchemy research) Week 2+: Astrologer’s Tower, Port Area, Town restoration
Location connections
Each location feeds into the economy:
- Graveyard → Garden — corpse byproducts for compost, or sorting for army
- Garden → Town Workshop — food for zombie workers, crops for sale
- Town Workshop → Town — finished goods for restoration and NPCs
- Swamp → everywhere — reagents for alchemy, clay for pottery
- Port Area ← Town — final destination of restoration effort
The tech tree controls which locations you can meaningfully use. The automation page explains how zombie workers connect locations into a supply chain.
Related reading
Farming: farming. Automation: automation. Alchemy: alchemy. Town restoration: rebuild the Town. Combat zones are not covered here — they appear in combat.
Frequently Asked Questions
Quick answers Keepers ask before September 22.
What are the main locations in Graveyard Keeper 2?
Confirmed locations: Garden, Graveyard, Town Workshop, Astrologer's Tower, Town — Port Area, and The Swamp. Each has a named HUD chip.
Where is the Astrologer's Tower?
It appears on the HUD as a named location. The art diary highlights the ritual floor interior. It is likely tied to mystical research or Inspirations.
How does fast travel work?
The Teleportstone is removed. Fast travel uses Milestones — unlock checkpoints at discovered locations, then use the Map tab to travel between known Milestones.
Where is Clotho the alchemist?
Clotho is in the center of The Swamp during daytime hours. The Swamp is also where you harvest clay and alchemy reagents.
Can I access Town on day one?
No. The Graveyard and Garden are the starting zones. Town Workshop is visible but likely requires some tech tree progress. Port Area is mid-game content.